Composting! I’ve been eating more fresh fruits and veggies and have started having some moral dilemmas about throwing out my scraps. With their garden, my parents started composting, and I’ve been enamored of it for a few years. Mmmmm decomposition. Much science, many dirts.
I have looked at several plans, and none quite fit my aesthetic. Also, since this might not be my forever home, I wanted something that I could collapse and move easily. The big must haves for me were:
- A bin large enough to hold a lot, but not an entire decomp center
- Air flow and something to let the worms in
- Easy access to turn and retrieve dirt
- Style
- Cheap
- Movable
For materials, you can use any number of woods, depending on your budget, space, and stance on aging/lumber treatments. Cedar was my first choice, but I didn’t feel like spending $100+ on lumber to let food rot in it. Cedar is naturally bug and water resistant and tends to hold up better over time. People have different opinions on treated lumber; it’s weather and bug resistant, but the treatment could seep into any foods you may harvest. Then there’s untreated lumber which can be a victim of the elements. This is my first attempt at composting, so I was more inclined to get free pallet wood on FB Marketplace and add in a few new untreated finishing pieces. All in, this project cost about $60, but a lot of time with the pallets.
Materials
- 1 plastic pallet @ 43.5” x 43.5”
- Wooden pallets – You will need 50-55 pieces of wood:
- 20 @ 38”
- 4 @ 43.5”
- 2 @ 38.5”
- 3 @ 41”
- 8 @ at least 36”
- 10 @ at least 25”
- 6 @ at least 10”
- 1″ x 6″ boards
- 2 @ 41”
- 2 @ 44.5”
- 1 @ 35.25”
- 3-5 @ 38 “ for slats
- 1.5″ x 1.5”: 2 @ 41”
- 2″ x 4″: 6 @ 46”
- Plastic landscape fencing
- 23 gauge pin nails
- Screws
Tools
- Pin nailer
- Power drill
- Chop saw
- Circular saw
- Pry bar
- Hammer
- Stapler (I used a pneumatic stapler)
- Patience
Project Details
The overall construction is 3 panels and an opening with removeable slats. I chose to do basic sides with vertical slats for the panels that weren’t facing the house and one side with the chevron pattern.
Because I chose to position my bin with the opening to the right, I’ll talk about each panel like this:
- Front = chevron
- Back = Vertical slats
- Side = Vertical slats with smaller overall width on the left side
- Opening = removable slats on the right side
The front and back panels have an overall size of 43.5” wide x 41” tall. The side panel is 38.5” wide x 41” tall. I started construction with the front and back panels to assure the width matched the plastic pallet base. For each panel, I used a pin nailer to hold all of the slats in the right place before I screwed everything into its final position. Using pallets usually means nothing is EXACTLY perfect, so a pin nailer gives a little hold, but is extremely easy to pop off and reposition if you’re not happy with placement.
Back Panel
- Gather your pallet boards.
- 2 @ 43.5”
- 11 @ 38”
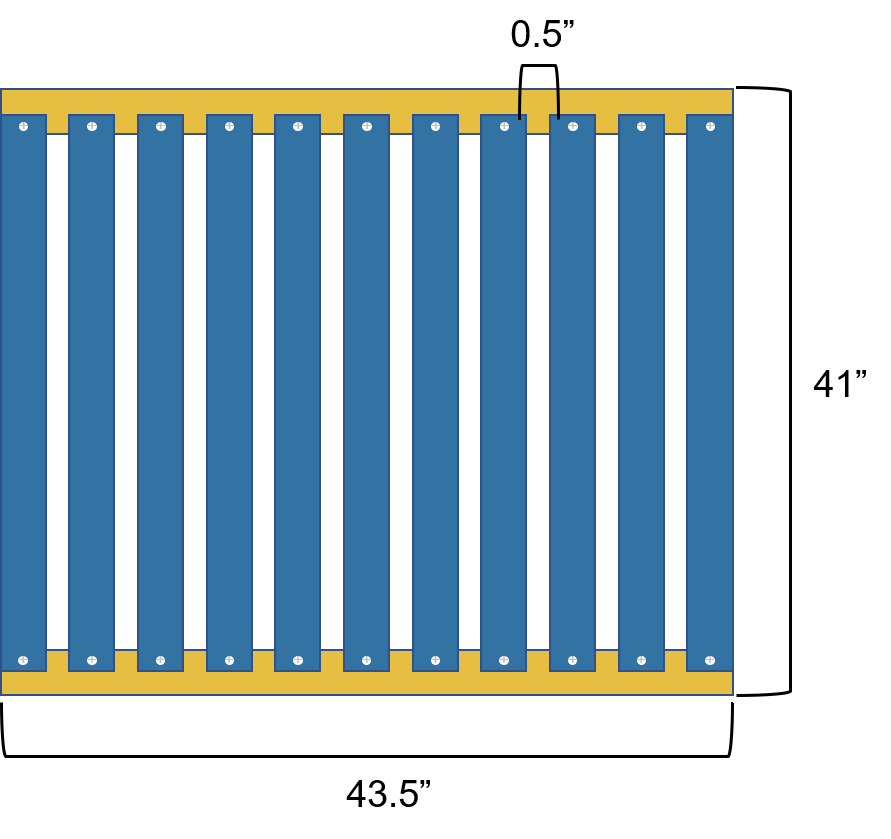
- Create a 43.5” x 41” frame.
With the two 43.5” long boards, pin nail them to two vertical pieces to make the overall height 41”. The vertical slats will not reach all the way to the ends for 2 reasons 1) most pallets are 40” wide and 2) I ended up sawing off the nailed edges of the pallet slats, because I was getting real sick of pulling nails. And a bonus 3) I found that I wasted more boards (and time) trying to pry them apart rather than just cutting them. Using the width of the board at the top and bottom helped add back the lost 3-4” from cutting. - Pin nail the rest of the slats evenly along the same side of the board.
My slats were, on average, 3.5” wide, and I used a total of 11 slats on the back panel. Using a 0.5” width of scrap board (at least 10” long) as a spacer, I pin nailed the 9 remaining slats in place evenly between the 2 vertical frame pieces along the top and bottom cross bars.
(Math: 3.5” x 11 slats = 38.5” of board width, 43.5” – 38.5” = 5” of space left to go between boards, 5”/10 = 0.5” space between each board)
- Screw the vertical slats into place at the top and bottom of each slat.
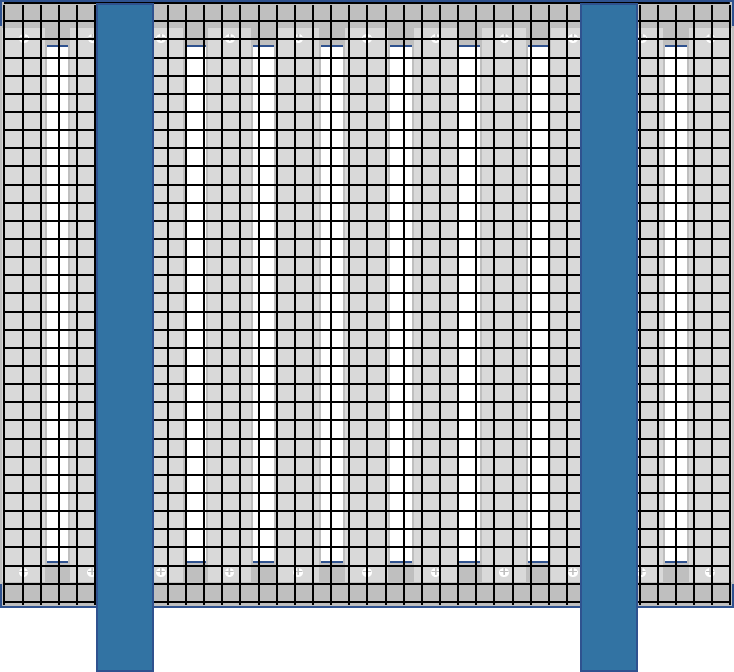
Once you are happy with your placement, it’s time to make it official. I only used 1 screw at the top and bottom per slat, unless one of the pieces of wood cracked, then I screwed both sides of the cracked wood. - Staple the landscaping material to the inside/back of the panel.
Front Panel
- Gather your pallet boards.
- 3 @ 41”
- 2 @ 43.5”
- 8 @ at least 36”
- 10 @ at least 25”
- 6 @ at least 10”
- Prepare the angled cut boards.
Prep your chop saw for a 45-degree cut. I suggest using an angle finder to assure it’s correct and/or doing some test cuts to make sure it’s perfect. Once prepped, chop one end of each of the 36”, 25” and 10” boards. This is where the boards will meet in the middle. Chopping all of them allows you to place the boards before pinning or screwing them down, making sure you have the right look, and the ends overhang the width of the panel. I ended up using about 22 pieces but cut more for options!
- Create the 43.5” x 41” support frame.
The support frame for this will have 3 vertical 41” boards that are spaced evenly to a width of 43.5”. The front horizontal pieces will be put on last. Since you are going to saw off all the edges, the width doesn’t need to be perfect, just make sure your chevron boards go all the way over the full panel width. - Mark the center line on the middle frame board.
Mark the center of the board the length of it to assure you have a guideline for all of your 45-degree cuts.
- Place your chevron pieces.
Starting at the bottom edge of the center board, align the 45-degree cut of the board with the center line and pin nail the boards in place. I worked my way up to the top, using a 0.25” spacer (a scrap piece of peg board) between each of the chevrons. Then, I went back to the bottom and aligned the boards to complete the panel.
- Screw your slats in place.
Once everything looks right, flip the piece over and screw the boards in place from the back. - Mark your cut lines for trimming.
I took my horizontal boards and drew a line where I needed to cut the edges off on the top and bottom to make the height 41”. Aligning the middle line of my horizontal boards with the middle line of the middle vertical board, I marked the edges of each horizontal board and took a straight edge to draw the cut lines for the sides. - Trim the sides of the panel
Using my circular saw, I cut away all the edges of the chevron pieces.
- Attach the horizontal boards to the front of the panel to finish the top and bottom edges, adding more screws from the back.
- Staple the landscaping material to the inside/back of the panel.
Dry Fit
Ok. You’ve got 2 panels done. You should take a few minutes to dry fit your front and back panels to attach 2x4s and double check your sizing, so you don’t have to resize your side panel.
- Attach two 46” 2x4s to each panel.
For each of the panels, you’ll need to attach 2x4s to the back of the panel to stick into the openings in the pallet base. The top of the 2×4 should sit flush with the top of the panel and extend down a few inches into the plastic pallet. With a lovely assistant, I drove the 2x4s into the pallet base and held the panel in place, marking the best place to secure the screws. Then I removed the 2x4s and screwed them into the panels.
- Double check the side panel spacing.
Once you’ve secured the 2x4s on both panels, put them back into the pallet base. Measure between the front and back panels to assure the side panel will slide in easily. Update any width measurements accordingly.
Side Panel
The side panel construction is the same as the back panel but with fewer slats (9).
- Gather your pallet boards.
- 2 @ 38.5”
- 9 @ 38”
- Create a 38.5” x 41” frame.
- Pin nail the remaining slats in place.
Using a larger spacer, I aligned the remaining boards. Since there are fewer slats, you could eyeball it instead of using a spacer.
(Math: 3.5” x 9 slats = 31.5” of board width, 38.5” – 31.5” = 7” of space left to go between boards, 7”/8 = 0.875” space between each board.)
- Screw all boards into place along the top and bottom horizontal supports.
- Staple the landscaping material to the inside/back of the panel.
- Attach the 2x4s using the same approach as the front and back panels.
Opening and Finishing
- Gather your boards.
- 1” x 6”
- 2 @ 41”
- 2 @ 44.5”
- 1 @ 35.25”
- 3 to 5 @ 38” (slats)
- 1.5” x 1.5”
- 2 @ 41”
- 1” x 6”
- Gather your boards.
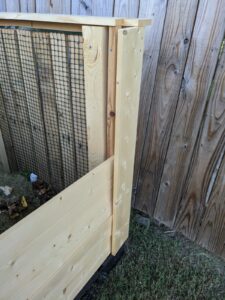
- Make the slat channel.
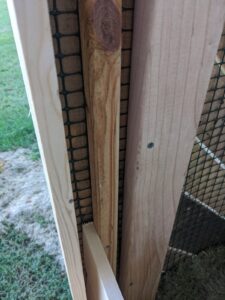
Using the two 1” x 6” x 41” boards, screw them to either side of the opening, aligning the outside/top edges of the wood with the outside/top edges of the front and back panels. Take the two 1.5” x 1.5” x 41” boards and align them 1.5” back from the front part of the slat channel on either side. Make sure to check your vertical alignment for level. Screw the board in place. - Check your slat fit.
Your 38” slats should slide between the two pieces of wood easily, but still stay in place.
- Finish the top edges of each panel.
For the front and back panels, align the 1” x 6” x 44.5” pieces with the back edge of the interior 2x4s. Mark where the slat channel is on each side, and cut a notch (approximately 1.75” x 2.25”) in the top plate to allow clearance for slat removal. Secure the front and back top plates with screws. Secure the last 1” x 6” x 35.25” top plate to the side panel with screws.
You are finished! Go compost some stuff!