Project Details
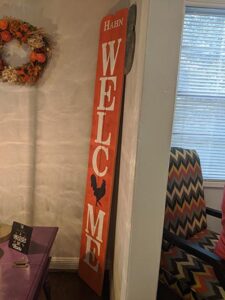
My BFF Becky got this adorable welcome sign as a housewarming gift. I fell in love. When her sister-in-law had to have one, too, I was quick to volunteer for the project.
Let’s make this sign!
Backstory: The family name, Hahn, means “rooster” in German. So, the addition of the rooster has some significance here. However, I think it would look awesome regardless of the family name.
Materials List
- 2 pieces of fencing: I used 5.5″ x 6′ pine boards
- 4 pieces of backing boards: I used 3/8″ x 2″ x 10″ pine scrap wood
- 8 screws: I used 1/2″ wood screws
- Paint: I used 2 cans of spray paint, small bottles of hobby paint for the stencils, and a clear coat of spray paint
- Stencils: Purchased or created from a stencil blank
- Brushes: Stencil brushes or small paintbrushes for hand painting
- Double-sided tape and painters’ tape
Tools List
- Circular saw
- Orbital sander and various grit sandpaper (80, 100, 150, 220)
- Power drill and countersink bit
When you are getting your fencing, inspect each piece to assure the wood isn’t cupped or warped. Fencing isn’t meant to be perfect, so selecting the best ones will make prep and assembly much easier.
Especially if the wood has been outdoors, you will want to bring it inside to dry and acclimate to inside/covered temperatures and humidity. Just like skin, wood is susceptible to the elements. I would give it at least 2 days to adjust, more if there’s been a recent rain.
When you’re ready, it’s time for sanding. The fencing will be rough and probably covered in a layer of…stuff. Start with a lower grit sandpaper (60 or 80), and sand all sides. Don’t forget the edges! Go over it again, increasing the grit each time to get to your desired smoothness. If you are painting with a brush, I recommend sanding with up to at least 150 or 220 grit.
Why so much sanding? You use the lower grit to get the most uneven parts down to a manageable level and then increase the grit to gradually get to a smoother surface. If you start with 220, it will take you forever, and you will go through a TON of sandpaper to get there.
After sanding, I added a step that isn’t exactly necessary, so you can skip it if you want a more rustic feel. I wanted my boards to sit closer together without much of a gap. I took a block planer, clamped the fencing to my bench, and planed them to be pretty close to flush.
Next, we measure the overall width of the two boards side by side and subtract about an inch for the backing board length. My final width was 11″, so I marked my pieces at 10″. For the backing boards, you can use any size wood you’d like. I chose a 3/8″ thick, 2″ wide piece of pine. I wanted the profile of the completed sign to be narrow and the final product to be light.
Clamp your pieces to your bench, and using the circular saw, cut along the marked line. Keep in mind that the width of the blade will be taken out of the board, so make note of where you mark your line. Do you need to be inside or outside of it to keep it your desired length? To keep track, you can mark your line with an arrow to the side the blade needs to be on. Once you’ve cut your pieces to length, knock down the rough edges with a piece of sandpaper to make sure you don’t stick yourself. It’s easier to do this before you attach it to the fencing.
Before attaching your backing boards to the fencing, you need to pre-drill holes in the backing boards. Measure in the middle of the boards about 1.5″ from each edge and mark the location of each hole. For my boards, I wanted the screws to sit flush with the top of the wood. To do this, you need to countersink the screws. Your countersink bit will drill a pilot hole all the way through the backer board but also cut a larger hole about halfway (or the height of your screw head) into the wood to accommodate the screw head. Make sure to not go all the way through the board with the countersink hole, or your screw will not hold.
Now, you are ready to attach the backer boards to the fencing. Clamp the fencing pieces to your bench face down and side by side. Assure that everything is even from the bottom, so the sign will sit level on the ground. Place your boards evenly across the back of the fencing. Because my overall thickness was only about an inch (minus the countersink), I chose 1/2″ screws. They are long enough to go through both boards but short enough to not come out the front. Screw each board in place. The wood should start to even out across the face of the two boards as you attach the backers.
Hooray! You have a canvas. Wipe off any sawdust, and paint it your preferred color. For my sign, I used 2 cans of spray paint for the base. I sprayed both front and back but paid particular attention to the front, covering in about 3-4 coats. You could definitely use regular paint, if desired. A quart should be plenty.
Let’s talk about stencils. I could only find a stencil off the shelf that I liked for the rooster. All of the lettering I found was too small, too large, or in fonts that I didn’t like. I chose to make my own stencils. This is optional, but I highly recommend that, if you do make your own, you use stencil blanks. The blanks will give you reusable lettering for later. For when everyone looooooves your sign and wants one.
I did not have luck painting with the stencils as one would typically use a stencil. You might have better luck, but if I do this again, I will definitely hand paint the lettering and any designs. To do this, tape down the letters using painters tape and trace the letters on to the wood. I used a regular pencil for the black rooster and a white-leaded pencil for the white lettering. I removed the stencils as I painted each letter so I could double check the outlines before removing the stencils. Hand painting takes a steady stroke and a bit of time, but I think the outcome looks much better than my stenciling.
Once dry, spray with a clear coat of spray paint, and you are ready to welcome all of your guests to your home!